VideoWizard
|
|
This document is a quick installation guide to the VideoWizard and VideoMagic Motion JPEG video capture boards. Both boards are similar in installation and use, and throughout this manual, the instructions for the VideoWizard and VideoMagic can be used interchangeably. Areas where there are differences between the boards will be noted.
More comprehensive installation information is provided in the VideoWizard/VideoMagic Installation Manual Chapter 3: Hardware Installation and Chapter 4: Software Installation.
VideoWizard and VideoMagic run under Windows 95. We recommend that for best results, follow the suggestions in Chapter 2 (Minimum system requirements) regarding the suggested system requirements.
There are two software packages that come with
1.Windows driver (installed from
2.MediaStudio 32-bit video capture and video editor (installed from CD-ROM)
In addition to these software packages, the VideoMagic board comes with an AVI to MPEG converter, which is installed from CD-ROM.
|
|
| ||
Installing the hardware and driverPerform these steps to install the VideoWizard and VideoMagic hardware and driver:1. Turn the computer and all peripheral devices off. 2. Unplug the computer from the AC power outlet. 3. Remove the computer cover. (Refer to the computer manual.) Note: Always discharge static electricity before handling VideoWizard or VideoMagic boards or inserting the card into a slot. To discharge static electricity, touch any grounded metal surface.
|
||
|
4. Insert the VideoWizard or VideoMagic board in an open, 16-bit ISA slot.
5. Replace the computer cover and plug in the computer.
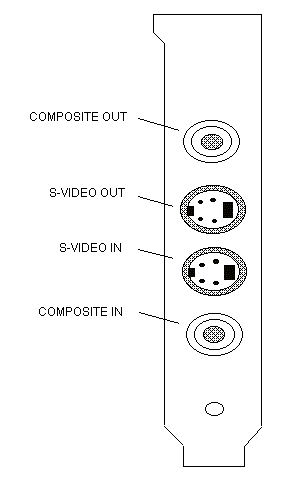
6. Connect S-Video and/or Composite video cables to the appropriate connectors on the back panel of the VideoWizard or VideoMagic board for signal input and output from a video source (e.g., a Camcorder, VCR, TV tuner, or Laserdisk player). From top to bottom, the connectors are: S-Video out, Composite video out, S-Video in, Composite video in.
7. Both the VideoWizard and VideoMagic boards use the Windows driver from the VideoMagic Installation Diskette. Insert this diskette into a floppy drive slot (usually drive A:).
8. Click on the
9. Answer the questions as they appear during the installation process. The default Interrupt is 15, which in many systems is used, so be prepared to choose an alternate Interrupt number. If you need to get more information on finding and choosing an unused Interrupt, please refer to Installation Troubleshooting - Interrupt conflicts.
After a message appears indicating that the installation process has been successfully completed, VideoWizard is ready to capture and playback video clips on your desktop computer!
|
| |
|
| ||
Using VideoWizard or VideoMagic to output your digital video productions to video tape. | ||
| After creating your digital video productions with Media Studio, in order to record the digital movies back out to a VCR, you need to create a Motion JPEG (MJPG) encoded AVI file. Here is how you do this ... |
| 1. Use Media Studio�s video editor to edit your digital videos. | ||
| 2. When you are finished editing and are ready to output your digital video to video tape, click on: | ||
| File/Create/VideoFile | ||
|
3. A pop up window will open for you to name and select what type of AVI file you wish to make. Name your video production. Then click on:
Options/Compression and choose MJPEG. Then click O.K. | ||
| 4. Click on Save to create your final video production. This process can take a long time, depending upon how complex your video and audio effects are. |
|
5. Check to see that the VideoMagic driver is confiqured to play back to an External monitor.(refer to page 4-4 under Driver Setup). To find this menu, click on:
ControlPanel/Multimedia/Advanced |
||
|
Look under VideoCaptureDevices and click on:
MotionJPG Capture Driver
and then Settings.
|
| Make sure Playback is set to External Monitor. | |||
|
6. If your video production contains audio, be sure the LineOut on the sound card is connected to the AudioInput of your video record deck. Now play the clip using Windows MediaPlayer or Media Studio�s Player and you are ready to record! Note: Certain versions of Windows95 will force your played back video to appear on your VGA screen instead of the video output jack on the VideoWizard board. If this happens on your PC, you can use the MediaPlayer, which is installed during the Driver installation. It can be found in the VideoMagic folder: | ||
|
|
Installation TroubleshootingInterrupt conflictsOne of the few problems that are found after the installation of the VideoWizard is an error message in the Video Capture program stating 0 Frames Captured. Check Vertical Interrupts. This is caused by an Interrupt conflict in your PC. The default Interrupt is IRQ15. This IRQ is often used by PC�s, and therefore requires that the VideoWizard interrupt be changed. To change the Interrupt number, use the VideoWizard Driver Setup described above under Motion JPEG Capture/Playback Device Setup dialog box (see above for this dialog). |
|
Note: Plug-and-Play under Windows95 can select and reserve Interrupts which are used by PnP devices. But it will not recognize and reserve interrupts used non-Plug-and-Play devices such as the VideoWizard board. One way to find the interrupts which Windows95 knows about is to look in the ControlPanel under System/DeviceManager and double click on Computer:
Notice in the dialog box above that IRQ15 is in use, but that IRQ9 and 12 are available. To change the interrupt to one that is available, use the Interrupt number in the Motion JPEG Capture/Playback Device Setup dialog box (see above for this dialog) . |
| Cannot output video to an external monitor or VCR |
|
Most problems with video output are caused by not setting the Playback mode to External Monitor. See Outputting your video productions to videotape, step 5.
If you have checked this setting and you still cannot output to videotape, your PC might have a version of Microsoft Activemovie installed which is forcing the video output to the VGA screen. If this happens, you can disable Activemovie while recording. To do this, go into ControlPanel and then click on Multimedia, then Advanced Properties. Open up Media Control Devices. You will se this dialog box: Then double click on Click on OK and ActiveMovie will be disabled. You can re-enable ActiveMovie at any time by using this dialog box. |
|
Other problems
The VideoWizard needs the I/O bus to be run at 8.33MHz maximum, therefore it cannot be in an enhanced mode.Some PC�s run the I/O bus at speeds over 8.33MHz, which will cause capture problems with the VideoWizard.
|
![[HOME]](../html/images/backhome.gif) Back to Home Page
Back to Home Page
Questions, comments, or problems regarding this service?