
|

Live video digitized by WinCast/TV and WinTV-pci boards can be captured as a video sequence (or video clip) by using the WinTV-Capture program. This program is provided on the WinCast/TV Application Diskette and uses Microsoft�s Video for Windows capability which is built into Windows 95.
WinTV-Capture creates a file type called AVI (Audio/Video Interleaved) on your hard disk. This file contains digitized video and, optionally, audio.
WinCast/TV and WinTV-pci give high quality captured video by storing uncompressed digitized video in an AVI file. This compares with compression methods such as JPEG and MPEG, where some loss of video quality is accepted in order to reduce the amount of data stored. Uncompressed video capture creates high quality digital video movies, but requires optimized system performance to avoid lost video frames (called dropped frames.)
To create the best quality digital videos, use the following steps:
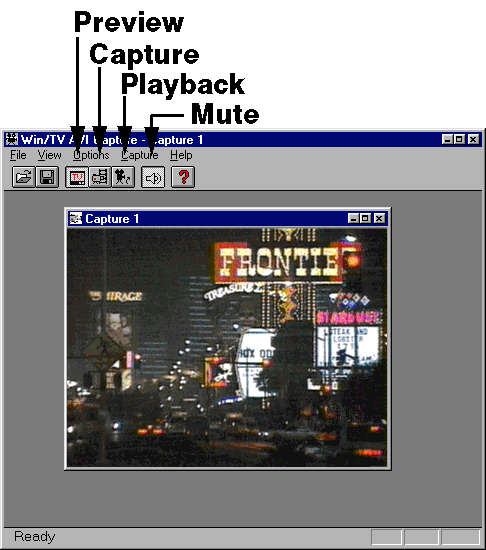
The WinTV-Capture program is an easy to use program that previews live video, captures AVI files to disk, and then plays back the AVI file to your VGA screen. WinTV-Capture can capture and playback video clips, but does not provide video editing capabilities. Programs such as Adobe�s Premiere and U-Lead Media Studio can be used to edit your digital videos.
With WinTV-Capture you can set the number of frames per second that are captured and the size of the video image. You need to do some experimentation to determine how much video your PC can store to the disk (in terms of image size and frames per second) because capturing video clips is very CPU and hard disk intensive.
Here is the WinTV-Capture window:

|
|
|
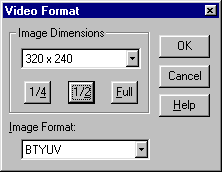
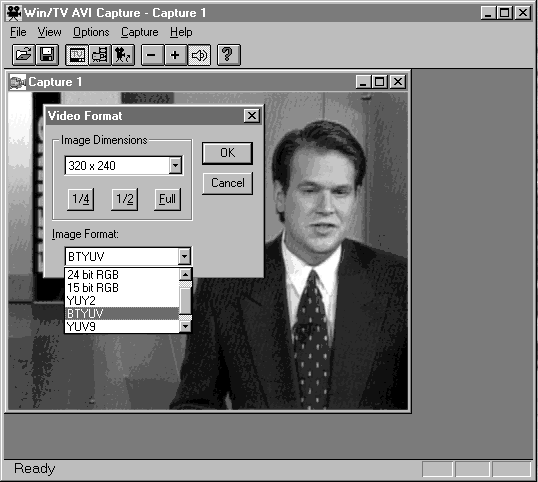
Setting the video image size and image formatThe maximum suggested video image capture size is 320x240. When playing back the video on slower PC�s, a smaller image size might be needed. To set the image size, click on Options/VideoFormat. The WinTV-Capture program can use several different types of color formats when capturing video clips. For highest capture performance, choose the BTYUV format. This gives excellent capture image quality and frame rate, but will give slow performance on playback of 320x240 image size videos. |

|
|
This format is great if you plan to edit your video clips in Adobe Premiere or MediaStudio, and plan to compress the digital videos using Cinepak or Indeo. If you do not plan to edit your videos and want good playback performance, choose a smaller image size (160x120) or try 15 bit RGB instead of BTYUV. Remember, capture and playback performance is determined by your system configuration, including CPU and hard disk speed. |
|
| Video Digitizing Formats and Maximum Frame Rates | Color format | Capture resolution |
Frames per second |
Notes |
|---|---|---|---|
| 32 bit RGB | 160x120 | 15 | ... |
| 24 bit RGB | 160x120 | 15 | ... |
| 15 bit RGB | 320x240 | 15 | ... |
| YUY2 | 320x240 | 24 | UYVY by byte swapping |
| BTYUV | 320x240 | 30 | 3 words pack 8 pixels |
| YUV12 | 320x240 | 24 | Verticle subsampled 4:2:2 |
| YUV9 | 320x240 | 30 | Verticle subsampled 4:1:1 |

|
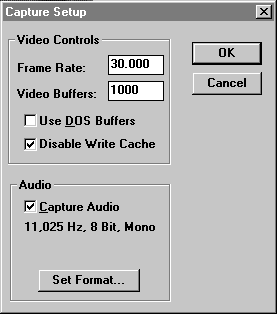
Setting the number of frames per second capturedTo set the number of frames per second captured, click on Capture/CaptureSetup. The maximum frame rate is 30 or 25, depending upon the TV standard using in your country. For example, in Nroth America, 30 frames per second is the standard, while in Europe 25 frames per second is used.The number of video buffers will depend upon how much RAM you have in your system. The maximum number of buffers is 1000. In the Capture Setup menu, you can also choose to capture audio with the video. |
|
After setting the video format, the number of frames per second and possibly creating a new file name (by clicking on File/SetCaptureFile), you can start capturing video by clicking on the CaptureVideo icon.
|
|
Preview VideoTo preview live video, click on Options/PreviewVideo. This shows how your saved video clips will look after been captured. The colors will be limited to the number of colors used by your VGA display driver. For example, if your VGA display driver is in a 256 color mode, you will only see 256 colors in the Preview window, even though a 16-million color AVI file will be captured. Note: You should not capture AVI files in Preview mode. |
|
To capture audio along with video, the WinCast/TV or WinTV-pci must be connected to a sound board capable of saving sound clips. The LineInput must also be selected as a source for the Sound Recorder. Do the following:
Capturing audio along with video puts a greater strain on your PC then capturing video alone. If your PC drops many frames while capturing audio and video together, then capture the audio separately with the audio capture utility from Windows. The audio can be merged with video later on during the video edit stage.
Captured image sizes can be either 160x120 or 320x240 pixels.
For the best trade off between image size and captured frames per second, use a 320 x 240 image. With a 486/66MHz processor (or better) and a reasonably fast hard disk drive, you should be able to capture 30 frames per second using the BTYUV format.This format uses a 2.5 :1 compression ratio compared to raw 24-bit per pixel video.

The consumption of hard disk space is dependant upon the size of the video image while capturing, the image format plus the number of frames/second. Using the BTYUV image format, the following chart shows hard disk space consumed:
| image size | frames/second | bytes per second | 1 minute video |
|---|---|---|---|
| 160x120 | 15 frames/sec | 425 Kbytes/sec | 26 Mbytes |
| 320x240 | 15 frames/sec | 850 Kbytes/sec | 52 Mbytes |
| 320x240 | 30 frames/sec | 1.7 Mbytes/sec | 104 Mbytes |
Video consumes quite a bit of hard disk space! At 320x240, you will only be able to store about 10 minutes of video on a 1 Gigabyte hard disk!
To reduce the amount of hard disk space used by your digital videos, you can edit the video using one of the popular 32-bit digital video editors (such as Adobe�s Premiere or U-Lead�s MediaStudio). After editing, you can compress the video using a software playback format such as Indeo or Cinepak (both of these are supported by Windows95). Typical compession achieved by these formats is 30:1.
![[HOME]](../html/images/home.gif) Back to Home Page
| Back to the Tips page
Back to Home Page
| Back to the Tips pageQuestions, comments, or problems regarding this service?
Copyright © 1999 Hauppauge Computer Works, Inc. All rights reserved.
The Hauppauge logo and WinTV are registered trademarks of Hauppauge Computer Works, Inc. Windows and WebTV are trademarks of Microsoft. Corp. Company logos are trademarks of their respective companies.